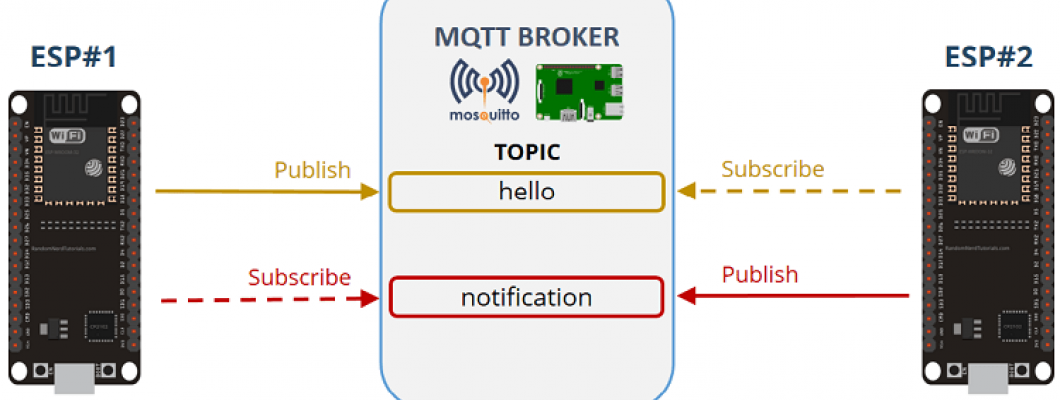
IoT is a hot topic in technology nowadays, which aims to connect and exchange data reliably with Machine to Machine communication. MQTT (Message Queuing Telemetry Transport) is one of the commonly used protocol in this field. It consists of MQTT Broker and MQTT Clients. Where MQTT Broker is the server through which all MQTT Clients are communicating with each other. CloudMQTT provides MQTT Broker as a service, which we are using in this tutorial.
In this project, we are controlling an LED connected to ESP8266 from a desktop application called MQTTLens. The MQTT broker will be running in the same local network. Installation of broker in Windows and Linux OS are also discussed below. This blog post divided by two parts. PART 1 (this blog) includes the general discussion about MQTT and installing MQTT Broker named mosquitto broker in a Local PC which acts as the server. The IP address and port used in this tutorial assume that you are installing the mosquitto broker with the default MQTT configuration. PART 2 - (link here) shows the sample code and expected output of the project described.
Components Required
- ESP8266
- 470Ω Resistor
- LED
- Breadboard
- USB Cable
- Connecting Wires
Hardware
Circuit Diagram
Bread Board connection
Understanding MQTT protocol
MQTT is described on the mqtt.org site as a machine-to-machine (M2M) / IoT connectivity protocol. This protocol is so lightweight that it can be supported by some of the smallest measuring and monitoring devices, and it can transmit data over far-reaching, sometimes intermittent networks. MQTT is a publish/subscribe messaging transport protocol that is optimized to connect physical world devices and events with enterprise servers and other consumers. MQTT is designed to overcome the challenges of connecting the rapidly expanding physical world of sensors, actuators, phones, and tablets with established software processing technologies. These principles also turn out to make this protocol ideal for the emerging M2M or IoT world of connected devices where bandwidth and battery power are at a premium. The following are the five things to know about MQTT protocol.
1) MQTT publish subscribe architecture
The MQTT messages are delivered asynchronously (“push”) through publish subscribe architecture. The MQTT protocol works by exchanging a series of MQTT control packets in a defined way. Each control packet has a specific purpose and every bit in the packet is carefully crafted to reduce the data transmitted over the network. An MQTT topology has an MQTT server and an MQTT client. MQTT client and server communicate through different control packets. Table below briefly describes each of these control packets.
2) Ideal for constrained networks (low bandwidth, high latency, data limits, and fragile connections)
MQTT control packet headers are kept as small as possible. Each MQTT control packet consists of three parts, a fixed header, variable header and payload. Each MQTT control packet has a 2 byte Fixed header. Not all the control packet have the variable headers and payload. A variable header contains the packet identifier if used by the control packet. A payload up to 256 MB could be attached in the packets. Having a small header overhead makes this protocol appropriate for IoT by lowering the amount of data transmitted over constrained networks.
3) Quality of Service (QoS) for MQTT
Quality of service (QoS) levels determine how each MQTT message is delivered and must be specified for every message sent through MQTT. It is important to choose the proper QoS value for every message, because this value determines how the client and the server communicate to deliver the message. Three QoS for message delivery could be achieved using MQTT:
- QoS 0 (At most once) - where messages are delivered according to the best efforts of the operating environment. Message loss can occur.
- QoS 1 (At least once) - where messages are assured to arrive but duplicates can occur.
- QoS 2 (Exactly once) - where message are assured to arrive exactly once.
There is a simple rule when considering the performance impact of QoS. It is “The higher the QoS, the lower the performance". MQTT provides flexibility to the IoT devices, to choose appropriate QoS they would need for their functional and environment requirements.
4) MQTT client abnormal disconnect notification
When an MQTT client connects to the MQTT server it can define a topic and a message that needs to be published automatically on that topic when it unexpectedly disconnects. This is also called the “Last will and testament” (LWT). When the client unexpectedly disconnects, the keep-alive timer at the server-side detects that the client has not sent any message or the keep alive PINGREQ. Hence the server immediately publishes the Will message on the Will topic specified by the client. The LWT feature can be useful in some scenarios. For example for a remote MQTT client, this feature can be used to detect when the IoT devices go out of the network. The LWT feature can be used to create notifications for an application that is monitoring client activity.
5) MQTT clients are very simple to implement
MQTT is open protocol and standardized by the OASI. This makes this protocol easy to adopt for the wide variety of IoT devices, platforms, and operating systems. Many applications of MQTT can be developed just by implementing the CONNECT, PUBLISH, SUBSCRIBE, and DISCONNECT control packets. A variety of MQTT client libraries are made available through the Eclipse Paho project. Python library using paho client is discussed below.
The IBM MessageSight messaging appliance helps to deliver the performance, value, and simplicity that organizations need for accommodating this multitude of devices and processing large volumes of events in real-time. IBM MessageSight is built from the ground up with new technology to provide high scalability. IBM MessageSight extends existing messaging networks by adding the following characteristics:
- Fast transaction rates
- Consistent lower latency
- Extensive scaling in the number of concurrent devices that can be connected
- Suitable for deployment in a demilitarized zone (DMZ)
In summary, MQTT is the protocol build for M2M and IoT which can help provide revolutionary new performance and opens up new areas for messaging use cases for billions of things connected through the Internet.
Installing MQTT Broker in Windows OS
Quick Install Mosquitto v 1.5.8
This version works with websockets.
Here is my download package and includes the SSL files for encryption.
Download Link: Mosquitto 1.5.8 Windows Files
Just unzip it go to the directory and run the broker manually
Starting Mosquitto on Windows
To start the broker manually open a command prompt and go to the mosquitto install directory and type mosquitto.
You can also use various command-line switches. Type
mosquitto -h
for help.
To start in verbose mode so that you can see console messages use the -v option:
Installing MQTT Broker in Linux OS
For simplicity, we will not be using advanced authentication techniques provided by the Mosquitto broker. Instead will stick on with the default port 1883 and without username and password for connection by the client.
Open a terminal and type the following command
sudo apt-get install mosquitto
The configuration will be saved in /etc/mosquitto/mosquitto.conf
You can make changes if required. But the server should be restarted making changes.
For restarting the mosquitto server after making changes, run the following command
sudo service mosquitto restart

